
Have you ever wondered about how people created those cute little square thingys next to their blog name?
Well, after a little research I found out this is called Favicons and Blogger has made it extremely easy to put this on your blog.
All you need to do is go on a Picnik to make your own!
I will show you how!
Set your Column and Row to 1

Change the background color to the color of your choice

Click Done!

1. Click on Stickers
2. Find the sticker that you want to use. You can also download images from the internet and save them to your desktop. Then you can upload them here using your phote basket at the very bottom of the page.
3. You may want to enlarge your sticker a little bit.

****For demonstration purposes, I added my name, but you do not have to. You really won't be able to see it.

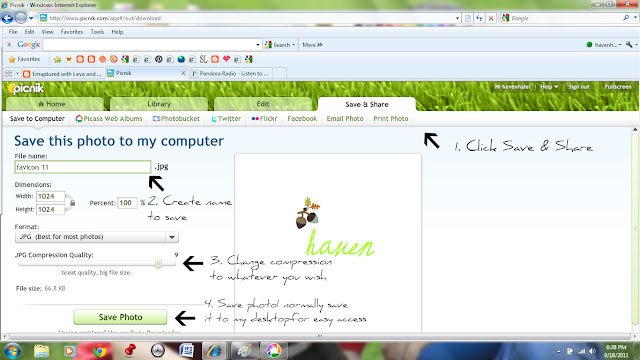
1. Click Save and Share
2. Create a name
3. Change the compression size if necessary.
4. Save to your desktop for easy access
Open your blog and click on Design

Next, click on Favicon edit

Then upload your saved image from your desktop.

And click save

Your favicon should appear, but sometimes it takes a little bit due to Blogger being glitchy at times. Sometimes mine is there and sometimes it is not.
Also, you can make a signature the same way and upload to Photobucket to get a code to embed on your signature on your posts. Once you have copied the code, go to your Design on your blog then Settings, Format, and then scroll to the bottom to find Post Template. Paste the code in the Post Template. Your signature will appear each time you write a post.
Hope this helps!!!
I will show you how!
Set your Column and Row to 1

Change the background color to the color of your choice

Click Done!

1. Click on Stickers
2. Find the sticker that you want to use. You can also download images from the internet and save them to your desktop. Then you can upload them here using your phote basket at the very bottom of the page.
3. You may want to enlarge your sticker a little bit.

****For demonstration purposes, I added my name, but you do not have to. You really won't be able to see it.

1. Click Save and Share
2. Create a name
3. Change the compression size if necessary.
4. Save to your desktop for easy access

Open your blog and click on Design

Next, click on Favicon edit

Then upload your saved image from your desktop.

And click save

Your favicon should appear, but sometimes it takes a little bit due to Blogger being glitchy at times. Sometimes mine is there and sometimes it is not.
Also, you can make a signature the same way and upload to Photobucket to get a code to embed on your signature on your posts. Once you have copied the code, go to your Design on your blog then Settings, Format, and then scroll to the bottom to find Post Template. Paste the code in the Post Template. Your signature will appear each time you write a post.
Hope this helps!!!

Great tip! How do you take full pictures of your computer screen when you are doing the tutorial? I wanted to do that and show how I made the button, but don't know how. Plus, adding arrows.
ReplyDeleteThank you so much!! Love your fall decor too!